Friday, October 18, 2013

Bronzed Winged Eye

Want something a little different this Halloween for makeup?

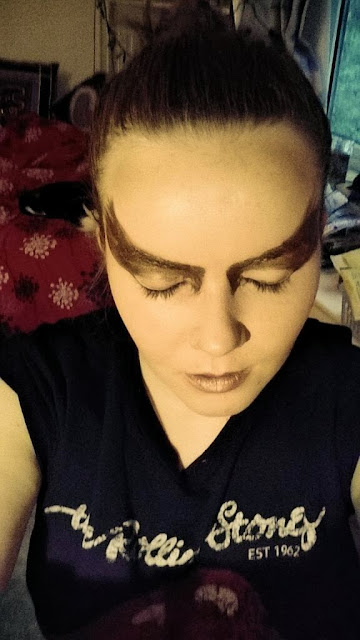
Try this super easy super quick bronzed eye look. Just grab a bronzed shimmery cream eyeshadow apply liberally to the eye area dragging out toward the hair line. Set with a brown shimmery eyeshadow, and contour the cheek bones well with a similar toned bronzer. Add a subtle brown lip and voila the look is complete!

This look was inspired by a Phoenix. But could be considered a masked look or just something cool to add to an outfit.

Super quick, and super easy.


Glitterati

Looking at all my glitter polishes I thought about what you could do. Diamonds came to mind so had a play with design.

Using glitter top coats, to cover colour or a polish with shimmer built in, or simply just using a glitter top coat like the Opal Top Coat from Avon as a polish.

Have fun playing with polish and colour.

Haunted Halloween

Halloween is right around the corner, and parties are being planned, outfits bough and candy stocked up. I was bored the other night and played around with basic designs that could easily be worn and re-created for Halloween.

So Happy Halloween and have fun re-creating these simple designs.


Tuesday, October 15, 2013

Getting the Chop for Cancer

So, this post is a little different from the norm, but there is a great reason for it I promise you!

I have been growing my hair for two years, longing for the perfect long hair you see girls sporting in all the magazines. However since my hair has been long enough to tie up all I seem to do is tie it up. Also people have told me how quickly my hair has managed to grow, taking all this into consideration I thought I would do something with all these locks of hair I dont seem to appreciate much, I am currently in the midst of trying to grow my hair as long as I possibly can by the new year, with the intent of then chopping it off in the name of Childhood Cancer, more specifically World Child Cancer. They are an organisation who provide treatment, diagnosis and support to those children with cancer in impoverished countries.

I know my blog doesn't reach many people but if whoever reads this could find two minutes of your time to donate £1 $1 anything! It would mean a lot to the charity and would help a great cause.

I am also donating the hair that gets cut off to Little Princesses Charity who turn human hair donations into wigs for Children with Cancer.

So please follow the link below and donate all that you can, and spread the word. I would greatly appreciate it thank you.

http://www.justgiving.com/Hannah-Riordan

Wednesday, October 9, 2013

Nail Stamps

Want the appearance of nail art, without having to have the patience and furness for it?

Try nail stamps instead! Designed to stamp a pre-cut pattern or image onto your nail quite easily without all the hassle of hand drawing everything on with nail art pens or brushes.

Purchasable from eBay you can get a starter kit with 5 image plates starting with bids of 1p!
Simply purchase some image plates and a nail stamp made from silicon or rubber, choose the image or pattern you wish to stamp, apply nail polish of your choice over the top of that image, using your applicator, lift the pattern or image off the image plate and stamp it onto your nail.

I hear that it does take a while to really get a good quality transfer. Make sure that you wipe clean excess nail polish off of your image plate, and re-use and re-use to your hearts content.

If you want to see some very good examples of nail stamp-ing, check out @nailstampfanatic on Instagram. (link below) She is really good, and creates some beautiful colour and pattern combinations using nail stamps and manipulation of nail polish like colour fades. She also divulges the details on where she gets each stamp used. So go say hello to her over on Instagram and follow her also for plenty of nail stamp and nail art ideas and inspiration!

Enjoy exploring another way to be creative!

http://instagram.com/nailstampfanatic

photo credit goes to @nailstampfanatic

Tuesday, October 8, 2013

Animal Print Eyes

Looking for something different for Halloween?

Try these really simple eyes.

Grab a gold shimmery eyeshadow and apply all over the lid and blending out over the brow and toward the hair line.

Then grab a liquid eye liner, or khol. And create half moon shapes.

Then place circles around to finish the Leopard print look.

Simple!


Clearing the Cobwebs

A very quick and simple makeup look for those up and coming Halloween parties!

Grab a bold red lipstick and a liquid black eyeliner.

Cover the eye lid right up to the brow in the red lipstick.

Using the liquid liner, create a spiderweb shade on the outer third of the eyelid.

Apply normal foundation add some over the top eyelashes, and a matching red lip and you're ready to go!

I used MUA Liquid Black Eyeliner 
Rimmel London red lipstick 
MAC 231 lip brush


Feeling Ghoulish ... Halloween makeup inspiration.

Simply using £5 worth of makeup, and makeup I already had within my stash, I created some really simple ideas to help enhance those halloween costumes I know many of you will be planning already!

Makeup used:

MUA eyeshadow palette £4 from superdrug.
MUA black liquid eyeliner £1 from superdrug.
Avon eyeshadow quad.
Red lipstick
Black Khol eyeliner.
Light foundation, or powder makeup.
Brushes to blend.

Start with a pale foundation or powder makeup to provide as a base, I used a mix of an airwhipped light foundation by Collection 2000 in biscuit mixed with Stargazer's white foundation. However anything that is paler than you will work as well, the idea is to make you look ill and pale. So anything that will achieve this is a winner.


Using a stippling brush, and my fingers, I made sure that the foundation was blended out nicely to create an even base for everything else. 

To create the lips, grab your khol black eyeliner, and line the lips just outside your natural lip line, adding definition to the corners of the mouth, fill in the lips with any red lipstick mine here is MAC Russian Red, and then using a lip brush or your fingers blend the black and red together, touching up the black eyeliner to finish to give a defined black outline.


Next grab your MUA eyeshadow palette and I also used my Avon quad. Taking the number 4 shade of my Avon eyeshadow quad on a contouring brush I applied to the hollows of my cheeks. Alternatively you could use shades 8 or 10 of the MUA palette, we're looking for a dark shimmery shade that is not black but a few tones lighter, as it'll give more shadow-like dimension. 


For an extra bit of contouring you can add definition to the chin, using the shame shade of eyeshadow. In doing this the face will look more skull like. 


Next we want to fill in our brows with shade 11 of the MUA palette, which is a slate black with a shimmer in it, mixing with it a little shade 8 just to make it less harsh. We want to define the brows and make them a statement, the heavier the brow the more menacing and ghoulish you will look. 


Following the line of the centre of the brows contour the nose with the shame shade blending out the edges as you go. 


Next taking the darker brown shades of your MUA palette, shade in the outer corner of your eye, blending up towards the brow, using lighter shades blend the colour towards the centre of your eye. Always blending up towards the brow. Repeat this process until you get the right amount of shading you wish to have. 


Next take your MUA black eyeliner and add some to your upper lash line adding a slight wing following the line of your existing eyeshadow. 

Next grabbing your blending brush gently apply a small amount of dark eyeshadow into your under eye area, to create shadow, and the idea you've been awake for 1000 years.  Using the same blending brush add eyeshadow in a dark shade to your temples and hairline to contour and add dimension to the look. Et voila, your ghoulish look is complete, simply style your hair as you wish and enjoy halloween!



Sunday, October 6, 2013

Its Better To Mix Things Up!

Let's face it the days of uniform one shade of nails are past us, jump on the mix and match trend and go with the flow and create your own personal mix of style and colour in a collaboration that's right on trend.

I went with punchy colours and bold prints and pictures in terms of nail art. I even attempted a houndstooth and kind of failed but created a cool looking pattern in the process. See even if you don't get what you expected you can still create something cool and fun!

Polishes I used:
Barry M Nail Paint in Fuschia
Barry M Gelly Hi-Shine (Blue and Purple Shades)
Essie in Mojito Madness
Maybelline Colour Show in Electric Shock
Barry M Nail Art Pen

Tuesday, October 1, 2013

Flower Power

Be daring, don't be afraid once your nails have started to chip to whip out that nail art pen and have a go, if the worse comes to the worse then you have the excuse they were chipping anyways to wipe the board clean.

I often use the opportunity of 'better days' nails to try new nail art on myself, rather than whipping out a nail art wheel. This time around I tried florals, usually I use my dotting tool to draw out rose style flower patterns but this time I tried drawing more detailed florals.

Polish is Stargazer - Silver I believer number 242
and a generic black nail art pen.